iPhoneで壁紙の上がぼかされるのを徹底的に避ける方法(iOS 18.2–)
最小限のスクショで徹底案内。
How to Completely Avoid the Top Blur on iPhone Wallpapers (iOS 18.2–)
Thorough guide with minimal screenshots.
➜ English
12/16追記あり
iOS 17以降のiPhoneでは設定する時に壁紙を移動させると上部が真っ黒や真っ白にぼかされます。
iOS 17以降のiPhoneでは設定する時に壁紙を移動させると上部が真っ黒や真っ白にぼかされます。
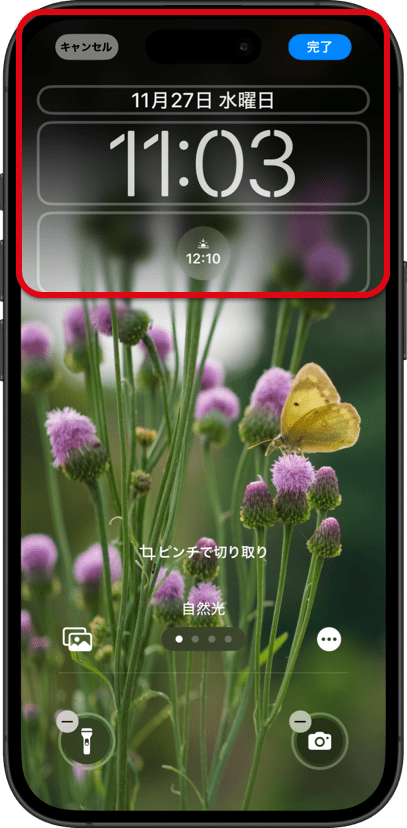
これを避けて自由に切り取る方法がiOS 18.2でまたまた変更されました。なぜか自動補完が働かずに逆に移動させてもぼかせない写真もあるのですが、そうなる条件に見て分かる一貫性はありません。シンプルにバグかもしれません。
大体うまくいく方法
スクリーンショットを壁紙にして、設定する時に上にスワイプします。
iOS 18.2では多くの機種で画面サイズ壁紙の上スワイプが復活しました(iOS17.1–18.1ではうまくいかない機種が多いです)。
スクリーンショットの撮り方は以下のとおり。写真アプリで好きな範囲を表示させて、右上の「切り取り」や下のインジケーター(Face ID iPhone)が消えるのを待ちます。そこで音量大と電源ボタンを同時し。
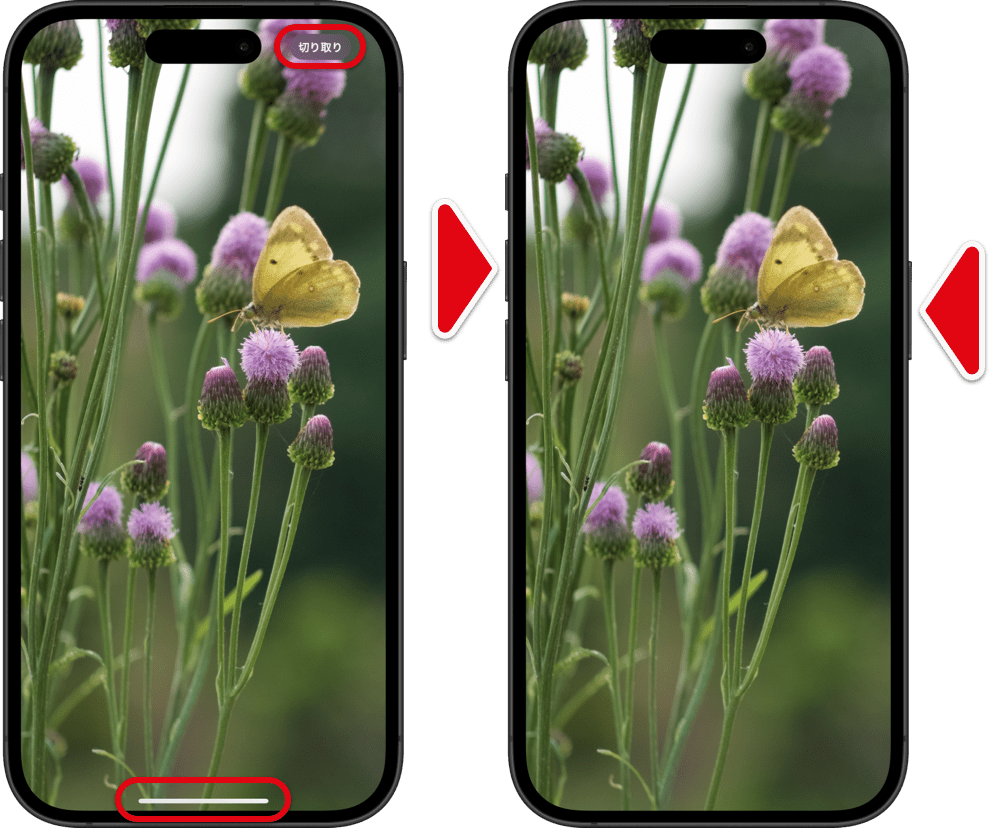
これを壁紙として設定する時に、ピンチインして上にスワイプします。
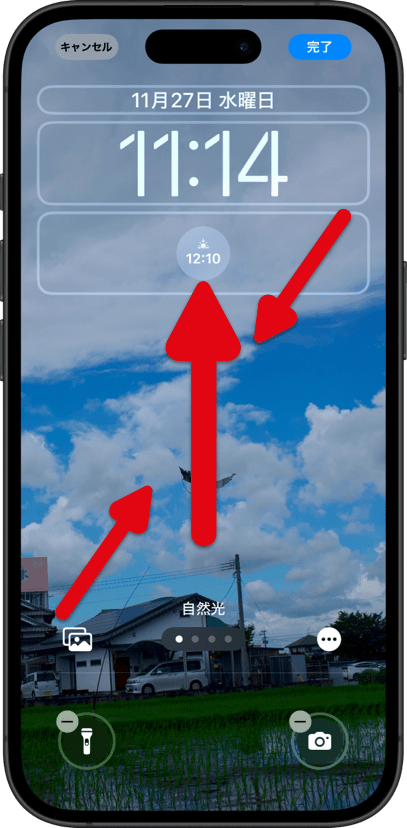
一点注意してください。設定時にはぼかしが消せないように見えても、設定後には消えている機種もあります。
基本的には写真アプリで壁紙サイズに切り取った画像でもいいのですが、機種によっては編集が壁紙に反映されないバグがあります。なのでスクリーンショットの方が確実なのです。
スクリーンショットや切り取りを使うのは画面サイズよりワイドな画像を使うとぼかしが生じたときにキャンセルできないからです。
それでもボケる機種だったら
機種によっては画面サイズの壁紙ではぼかしをキャンセルできないこともあります。
その時は従来通り写真アプリで超縦長に切り取った壁紙を上にスワイプします。
➜ 改めて壁紙の上がぼかされる時の対処法
➜ 改めて壁紙の上がぼかされる時の対処法

追記
それでもダメなら
超縦長でないとぼかしをキャンセルできず、写真アプリの切り取りも反映されない機種では写真アプリだけではどうにもなりません。しかし策はあります。
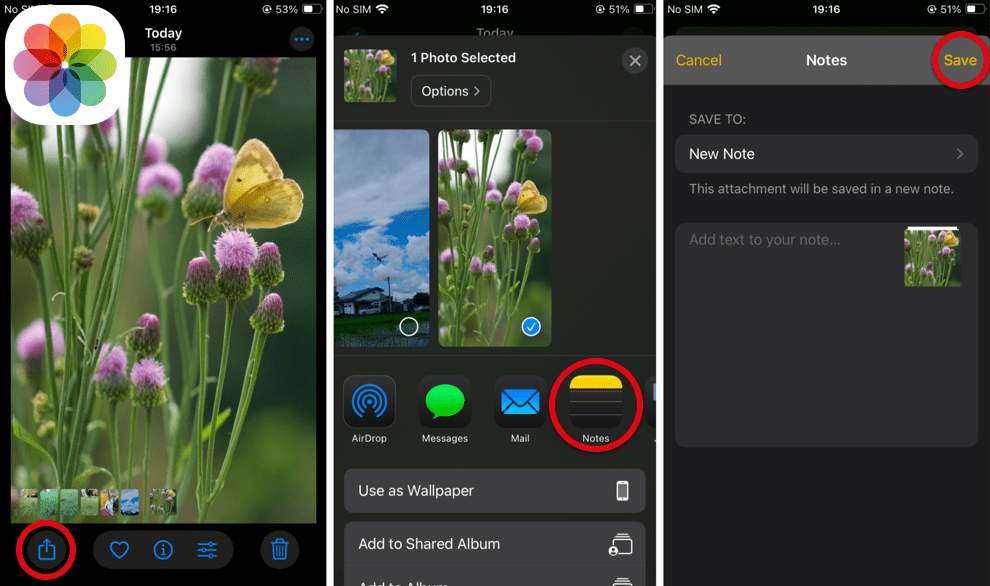
そのときはまず画像を超縦長に切り取った後で、写真アプリの共有ボタンからメモアプリに保存。
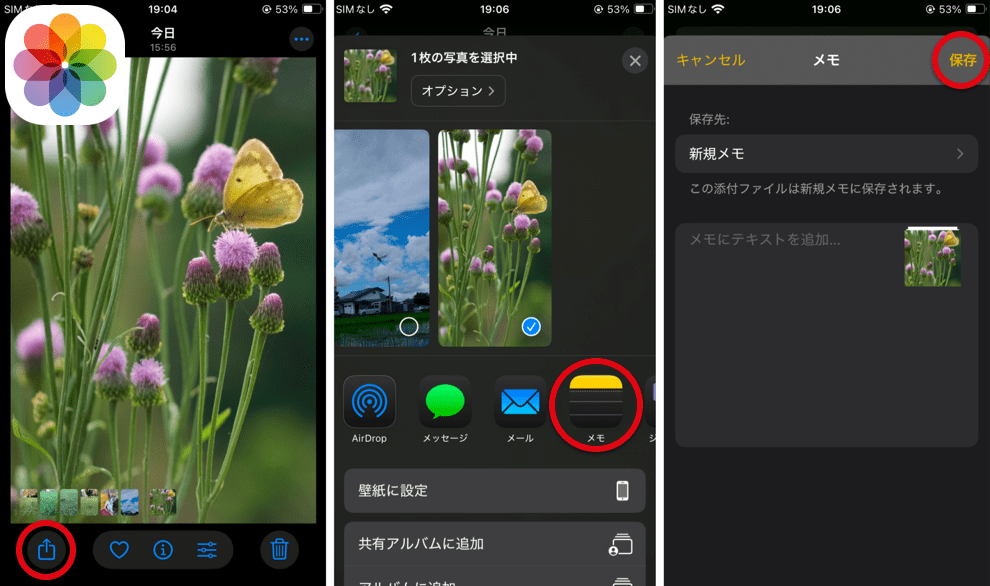
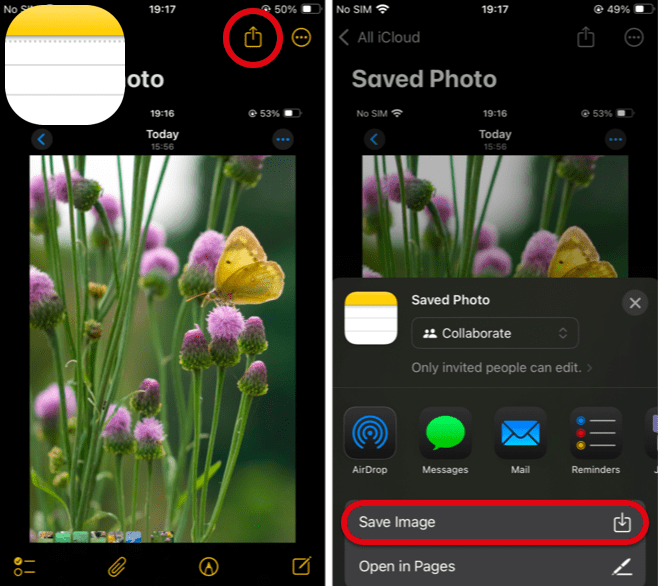
その画像をメモアプリの共有ボタンから写真アプリに戻します。
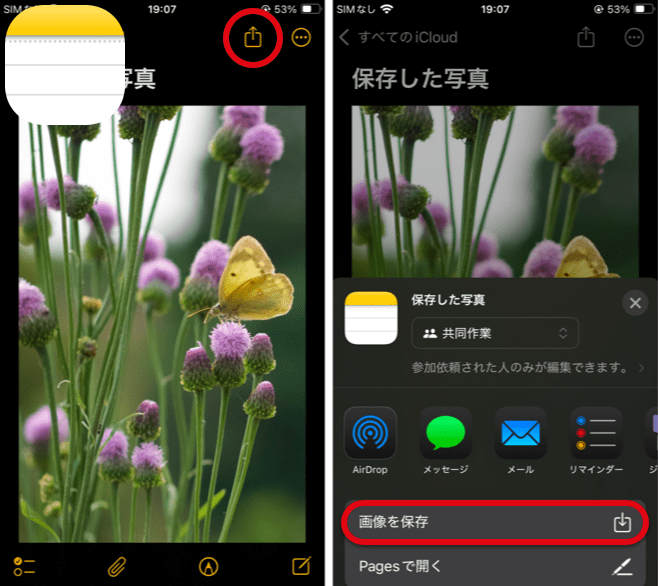
すると新しい画像からは元の構図が失われています。その新しい方を使って設定する時に上にスワイプしてください。
一度外に出して戻せばどんな方法でも新しい画像になっています。AirDropで他のデバイスを往復してもいいし、サードパーティの写真編集アプリを使ってもいいです。ただiPhone1台で無料で実行するとしたらメモアプリがおすすめです。
iOS 18.2のiPhone SE 3ではこの秘策は必要ありませんがスクリーンショットはSE 3です。これはRCの一つ前のベータで対象機種がSE 3だった名残りです。その時に用意した素材を使いました。iOS 18.2はRC -1、RC、RC2、オフィシャル版(ベータユーザー向けには配布が遅れたのでしょうか?)と直前に4度の仕様変更があり、機種を入れ替えながら最終的にはあらゆるバグが残りました(RC2では修正されていた一部の機種で編集が反映されないバグが再発。RC2で発生した一部の壁紙で自動補完がはたらかないバグは残ったまま)。ここまでフェイントが激しいとAppleに報告する暇もありません。
Updated 12/16
On iPhones running iOS 17 and later, moving a wallpaper during setup causes the top to blur with solid black or white.
On iPhones running iOS 17 and later, moving a wallpaper during setup causes the top to blur with solid black or white.
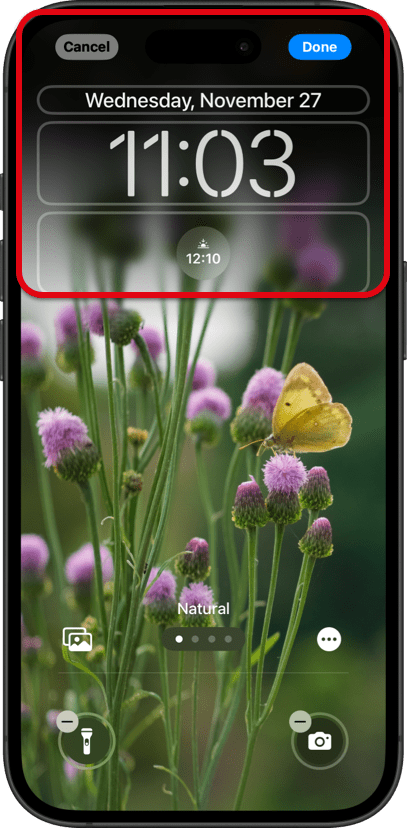
The method to avoid this and freely crop wallpapers has changed yet again in iOS 18.2. For some reason, there are photos where the auto-fill feature doesn’t work, even if you try to move them manually. However, there is no visible consistency in the conditions that cause this. It could simply be a bug.
A Method That Usually Works
Set a screenshot as your wallpaper and swipe up when configuring it.
In iOS 18.2, the swipe-up feature for screen-sized wallpapers has been restored on many devices (it didn’t work well on many devices in iOS 17.1–18.1).
Here’s how to take a screenshot: Open the Photos app, display the desired area, and wait for the top-right “Crop” and bottom indicators (on Face ID iPhones) to disappear. Then, press the Volume Up and Power buttons simultaneously.
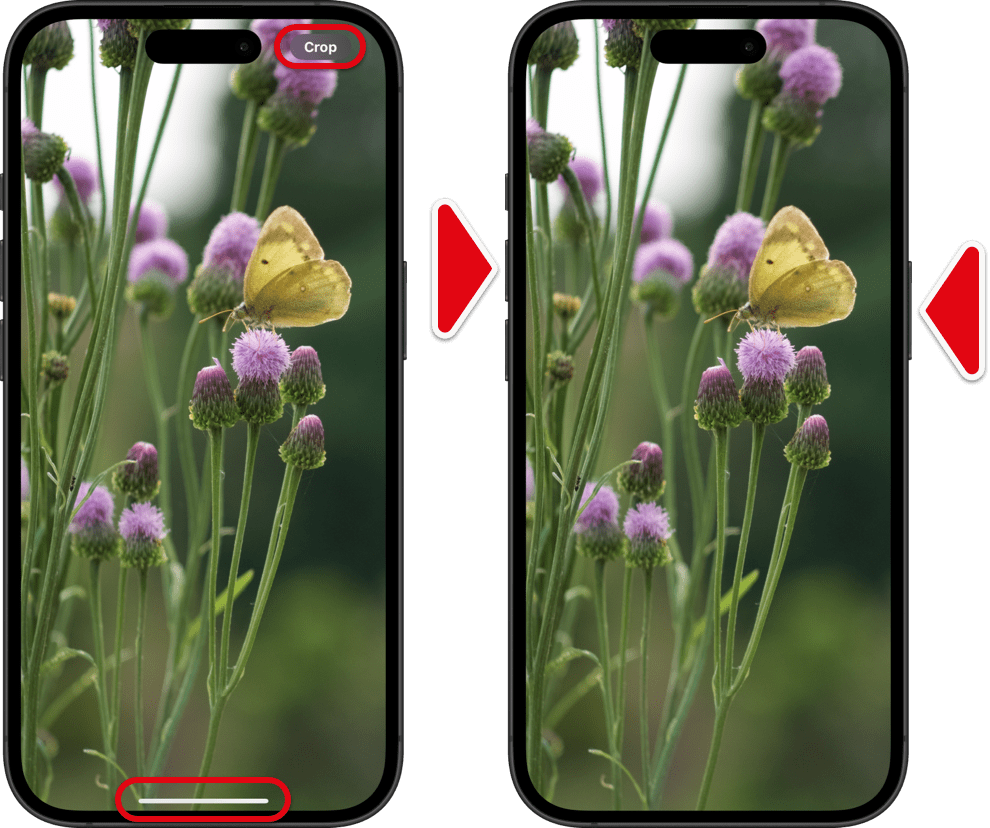
When setting this as your wallpaper, pinch in and swipe up.
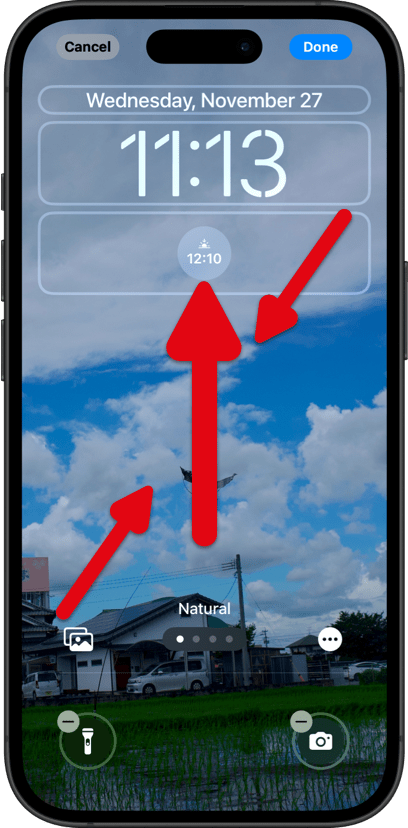
One thing to note: even if the blur seems irremovable during setup, it may disappear once the wallpaper is applied on certain devices.
Basically, you can use an image cropped to wallpaper size in Photos, but some devices have a bug where edits aren’t reflected when set as wallpaper. That’s why screenshots are more reliable.
Screenshots or cropping are recommended because using images wider than the screen size can result in blur effects that cannot be canceled.
If Some Devices Still Blur the Wallpaper
On some devices, screen-sized wallpapers might not allow the blur to be canceled.
In that case, follow the previous method: crop the wallpaper to an extra-tall size in Photos and swipe up during setup.
➜ Once Again, What to Do When the Top of the Wallpaper Is Blurred
➜ Once Again, What to Do When the Top of the Wallpaper Is Blurred

Added
If Nothing Else Works
If blur cancellation requires extra-vertical cropping and Photos edits aren’t applied, Photos alone won’t solve the issue. But there is a way around it.
In such cases, first crop the image to an extra-vertical size and save it to Notes via the Photos share button.
Then, use the Notes share button to save the image back to Photos.
The new image will no longer retain the original composition. Use this new version and swipe up when setting it as your wallpaper
Exporting and reimporting the image in any way creates a new file. You could use AirDrop to transfer it between devices or a third-party photo editing app. However, if you’re limited to one iPhone and want a free method, Notes is your best option.
This workaround isn’t necessary for the iPhone SE 3 on iOS 18.2, but the screenshot was taken on an SE 3. This is a remnant from the beta version just before RC, where the SE 3 was a target device. The materials prepared during that time were used here.
iOS 18.2 went through four specification changes—RC-1, RC, RC2, and the official release (Was the release to beta users delayed?)—right before launch, ultimately leaving various bugs (The RC2 fix for the edit save issue on some devices has regressed. The bug in RC2 where auto-fill doesn't work for some wallpapers remains unresolved.) while swapping targeted devices. With such rapid changes, there’s hardly any time to report the issues to Apple.
iOS 18.2 went through four specification changes—RC-1, RC, RC2, and the official release (Was the release to beta users delayed?)—right before launch, ultimately leaving various bugs (The RC2 fix for the edit save issue on some devices has regressed. The bug in RC2 where auto-fill doesn't work for some wallpapers remains unresolved.) while swapping targeted devices. With such rapid changes, there’s hardly any time to report the issues to Apple.

